

If you need to know how to upload addresses to RouteSavvy route planning software, it’s fast and easy if you follow a few simple guidelines on the process.
First, we’ll cover how to format the spreadsheet you want to upload. Then we’ll cover the actual process of uploading addresses into RouteSavvy.
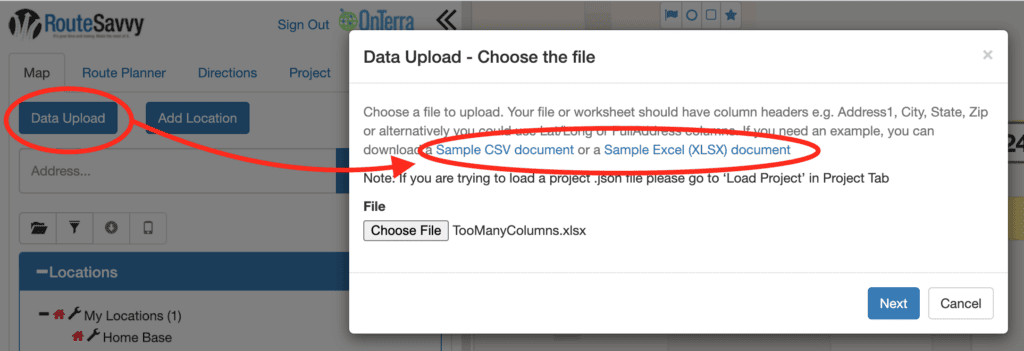
The best way to upload a spreadsheet of addresses into RouteSavvy is to choose either “Start with Blank Project” or “Continue Previous Work” at the Welcome to RouteSavvy screen, and then click the Data Upload button. RouteSavvy also provides detailed samples on how to format your spreadsheet for efficient data upload. To see a full example of how to format your spreadsheet in either a CSV or Excel file format, click on the document samples in the Data Upload dialog box. These samples will show you what column headers should look like in your spreadsheet.
Some spreadsheet formatting tips include:
1) Your spreadsheet must have 30 columns or less to be uploaded.
2) The number of locations in your spreadsheet should be 1,200 or fewer.
3) Essential fields are: Address1, Address2, City, State & Zip. Those are highlighted in yellow in the screenshot below.
4) While Country is not on the sample spreadsheet shown below, it often can be helpful to specify the country so the web mapping software on which RouteSavvy is based doesn’t get confused. For example, the U.S., Australia, Canada, and the U.K. have similar postal code systems, which can potentially be mis-identified by the web mapping software. In the U.S., for example, the postal code 01009 is assigned to Bondsville, MA, but postal code 1009 corresponds to an area in Manila, Philippines. As a result, we do recommend that you create best to create a column in your spreadsheet called Country and fill in the country for each location.
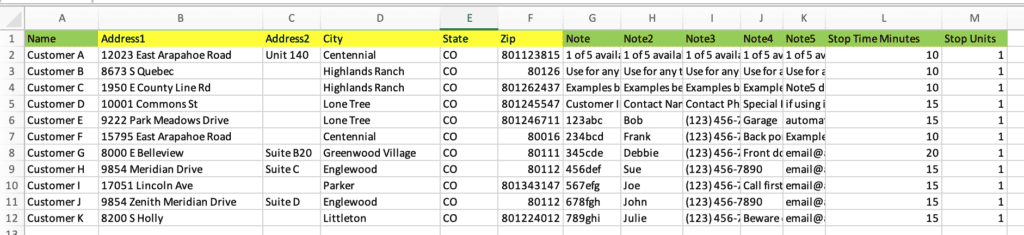
The optional fields, highlighted in green, are not necessary, but often are helpful. If you don’t use a Name column, RouteSavvy will name your locations “Location1”, “Location2”, etc., but most users prefer to put a personal or business name in this column. (Column A).
Some customers will copy the Address 1 column and put “Name” at the top so that the first line of the address shows up as the location name. RouteSavvy has 5 fields that can be used for notes, and these fields should be used to relay any information that is helpful to your driver or technician, i.e., your employee in the field. If you use the add-on RouteSavvy Mobile App, you will need to put any email addresses in the Notes 5 column for the automatic email notification feature to work.
The Stop Time Minutes column (column L in the screenshot sample) refers to the minutes you expect the delivery, pick-up, service call, or sales call to take, and that should be designated with a number of minutes even if the time will be longer than an hour. (For example, if the service call is expected to be one hour and 15 minutes, you would reflect that in the column as 75 minutes.)
You can vary the stop time minutes for each location, so put 30 if a location needs a 30-minute stop, or 5 if the location needs a 5-minute stop. When you create your routes and include anticipated Stop Time Minutes, RouteSavvy will add these minutes to the calculated drive time to give you a better estimate of the total time for the route.
The Stop Units column (column M) is generic by design, and should designate how many packages, or palettes, or cases are needed to complete the stop. This also must be a whole number. The last column header, also not mentioned in the sample spreadsheet, is “Folder.” This feature sorts your spreadsheet data into folders as you import the addresses into RouteSavvy. So, if you have a column that labels each location as either Monday, Wednesday, or Friday, and you use the column header “Folder” for that column, RouteSavvy automatically will sort all locations into 3 folders, one each for Monday, Wednesday, and Friday.
You can learn more about the RouteSavvy Folder Function Here.
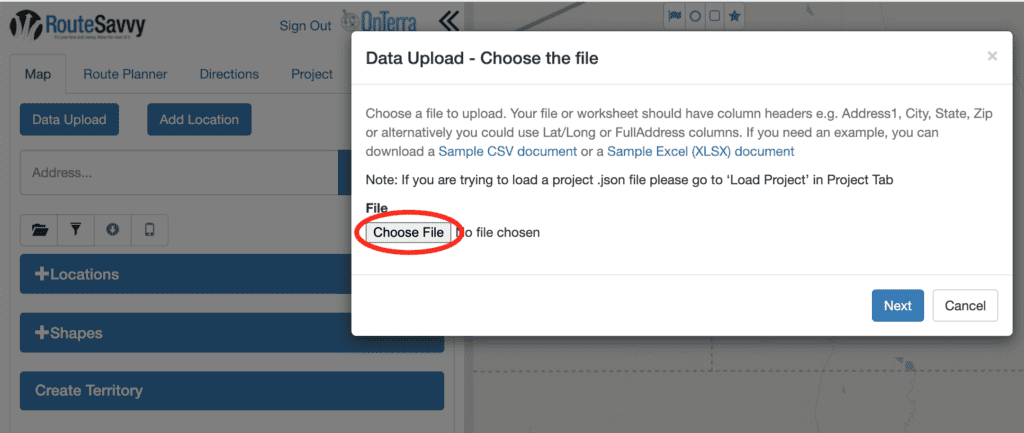
Once your data is formatted, proceed to the Map tab on the RouteSavvy screen and look for the blue Data Upload button on the left side of the screen. If you click “Choose File” in the Data Upload dialog box, you can browse to the location of your spreadsheet on the hard drive of your computer. You also can also drag your file onto the Choose File button and upload it that way.
Click the blue “Next” button at the bottom of the Data Upload dialog box and the “Data Upload – Choose/Update Columns” dialog box will appear. See the screenshot just below for a look at this dialog box. The Data Upload – Choose/Update Columns dialog box is where you can make changes to columns if needed. (Note: If you have formatted all of your data prior to uploading, you will not need to make any changes on this screen.)
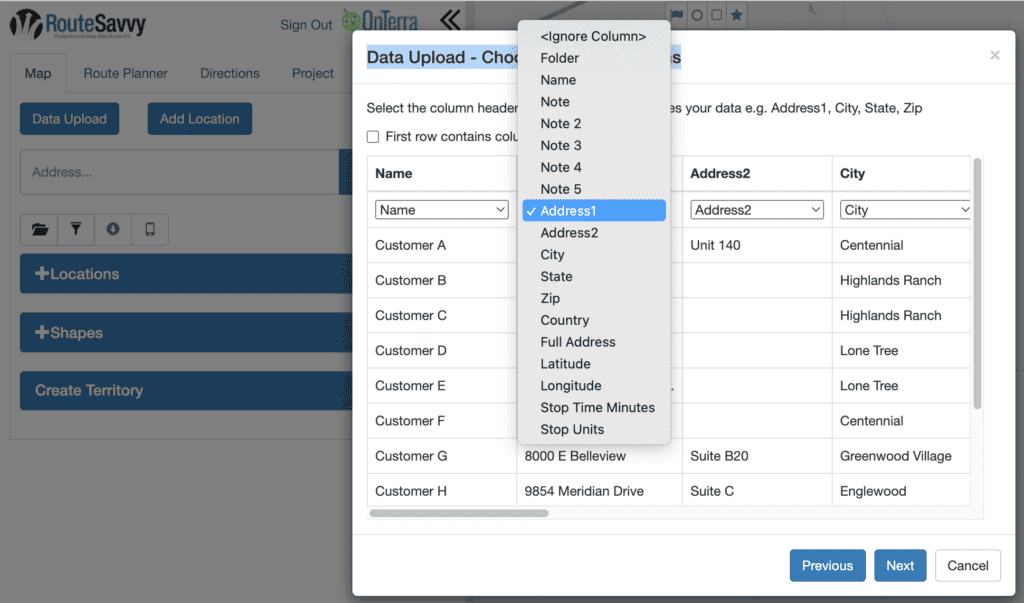
If there is anything you need to change, you can click on the drop-down menu for that column and choose the appropriate option.
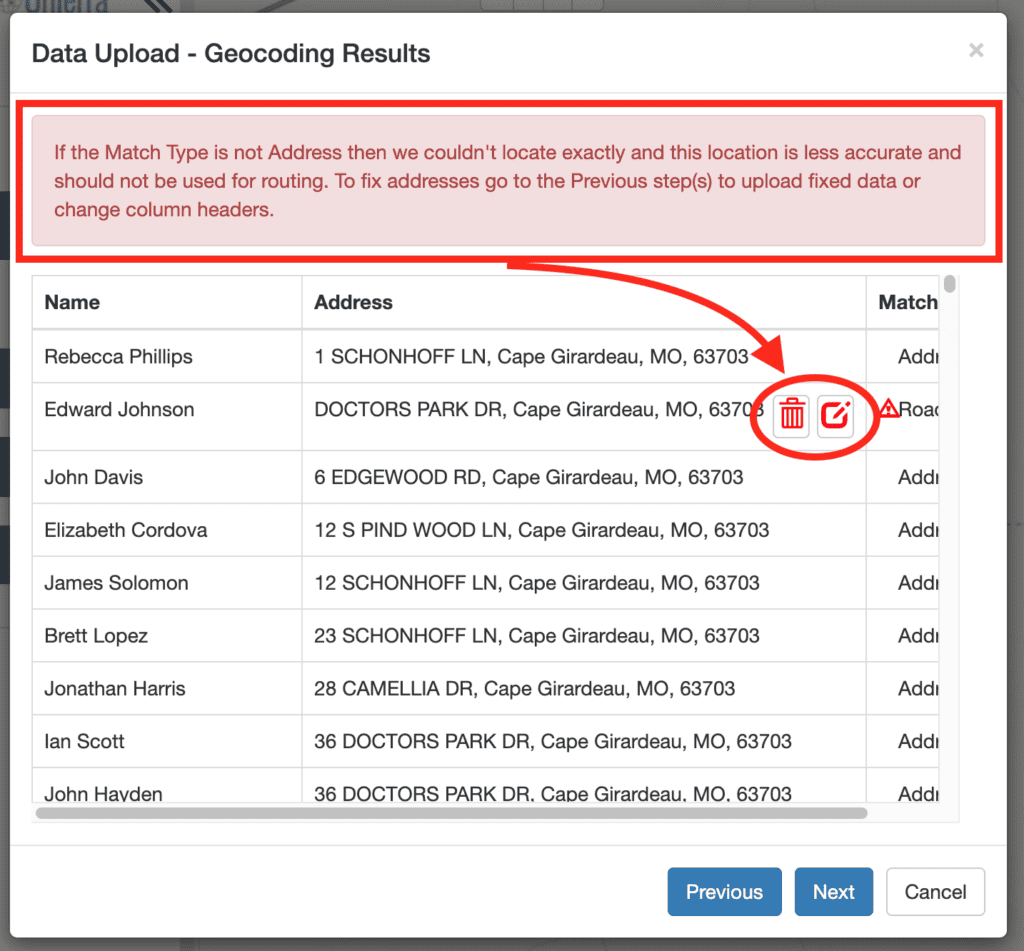
Clicking Next will take you to the Geocoding Results dialog box. Here you can correct any address errors, if needed. If you see the red letters at the top stating “If the Match Type is not Address…,” then there are some addresses you need to fix. You have the choice to either delete the location and add it later (by pressing the trashcan button) or to edit it (by pressing the pencil and paper button).
After correcting any incorrect addresses, simply click the Next button to import your locations into RouteSavvy.
When you learn how to upload addresses to RouteSavvy using these simple tips, it becomes a fast, efficient process so your business or nonprofit can save time & money with more efficient routes.