Search

RouteSavvy User Guide – 2.0 – Quick Route

RouteSavvy User Guide – 2.0 – Quick Route

A Quick Route is useful if you have a spreadsheet (.XLSX or .CSV) which contains 300 or fewer locations and you need to plan from 1 to 20 routes with the locations on the spreadsheet.  If your whole spreadsheet should all be planned into 1 to 20 routes, then Quick Route is the quickest way to go from upload, to optimization, to export.  If you have more than 20 routes, you will need to skip to the steps regarding the Route Planner Tab.

There are multiple ways to create a Quick Route. 
The first way (1) is to drag your file into the gray box on the “Welcome to RouteSavvy” dialog box when the RouteSavvy page first opens.  This will begin the data import process.  The second way (2) is to click “Choose File” and browse to the location of your spreadsheet.  Once the spreadsheet is selected, click on the big, green “Create Route” button.

You can also create a Quick Route from the Route Planner tab using the “Quick Route” button (3).  This will bring up the same dialog box with the big “Create Route” button.

If you choose an Excel file with multiple tabs, the following dialog appears “Data Upload – Choose the worksheet” which allows you to choose which tab of your worksheet you want to upload.  RouteSavvy can only upload one tab at a time.

The next dialog box, “Confirm Stop Addresses”, allows you to choose which columns to use from your spreadsheet for the Address, City, and ZIP, or to use instead one column for the Full Address.  This is an “either/or” decision, so you will use either “Address, City, and ZIP” or you will use “Full Address”.

If you have formatted your spreadsheet according to the format given in our sample .CSV and .XLSX files, then you will not have to choose any columns here, RouteSavvy will simply show this dialog box for a moment and proceed to the next dialog box.

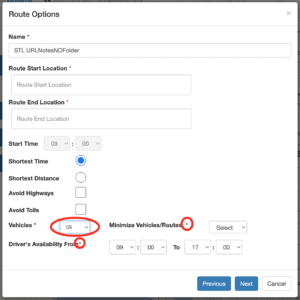
In the next dialog, “Route Options”, you can choose a name for your route, and the default start and end.  This default start and end will be pre-populated in any future route you create, until you change it.  To make a round trip, use the same address for both the start and end, but RouteSavvy also allows for an end-to-end route, simply choose the desired start and the desired end.  Please note that you can search here using points of interest, such as “LaGuardia Airport”, or you can search by entering an address.

You can also choose your default start time, whether you would like to optimize your route by the shortest time or by the shortest distance, and whether you would like to avoid highways or tolls.  The “shortest distance” optimization is advisable if you have a vehicle that cannot reach the speed limit, ie. a piece of heavy equipment that can only reach 25 miles per hour.

“Driver’s Availability”  is the start and end time for your drivers.  Please note, this is in 24-hour format, so 5:00 pm is 17:00.

“Vehicles” is the number of vehicles you have available to complete the routes, or it can simply be “the number of routes you want to create from this spreadsheet”.  For example, you could upload a week’s worth of stops in one spreadsheet and set Vehicles to 5 and it would give routes for an entire work week for one vehicle.
“Minimize Vehicles/Routes” is a setting that will allow RouteSavvy to use fewer vehicles if possible.  So if you have 8 vehicles available, but you don’t want to use all of them unless you need to, you can check the Minimize Vehicles option.  RouteSavvy might find that you only need 6 routes, for example, and it will only create as many routes as you need.

Please Note:  please be careful with the Minimize Vehicles button, at this time there is no way to uncheck it or deselect it, so if you accidentally click on it, you will need to go all the way back to the first “Create Route” screen and start over.
Also Please Note:  the standard RouteSavvy license includes 5 multi-route optimizations per day.  This is a premium feature, so if you need to use more than 5 multi-route optimizations per day, please contact us for pricing.  You can plan as many single routes per day as you need.

Once you have made all of your choices, press “Next”.  RouteSavvy will then put your addresses into the Route Planner tab and optimize them.  In the “Optimization Results” dialog box, you can use the “Mobile” button to export the routes to the RouteSavvy Mobile App or to create a mobile link.  The “Export” button gives access to all of our other route export options: 
text file (.TXT), .PDF format, .GPX format (to load directly to a GPS unit), and .CSV (this is helpful either to print out a simplified summary of the route, or to upload to other software).

The “Print” button allows you to send the route directly to your printer.  The “Map” button allows you to see the route on the map, and to access all the other RouteSavvy features.